Grocery Cart Seat Cover... suggestions
 I've gotten so many requests for this that even though I never use a cart
cover myself, I felt it was time to sit down and tackle the problem. I'm trying
to do this without copying anyone else's design, but I'm sure I will inadvertently
incorporate features of existing cart covers, simply because there are only so
many variations on a cover that will fit a cart. Any such resemblance is purely
coincidental, however. I do own one cart cover, but I'm not wild about its design,
which does not seem to be original in any case.
I've gotten so many requests for this that even though I never use a cart
cover myself, I felt it was time to sit down and tackle the problem. I'm trying
to do this without copying anyone else's design, but I'm sure I will inadvertently
incorporate features of existing cart covers, simply because there are only so
many variations on a cover that will fit a cart. Any such resemblance is purely
coincidental, however. I do own one cart cover, but I'm not wild about its design,
which does not seem to be original in any case.
These suggestions include no-sew directions (using polar fleece), some sewing
(using fleece and fold-over-elastic), or lots of sewing (using woven fabrics
and bias tape).
This pattern is copyright to
me (Jan Andrea) and is NOT for resale under ANY circumstances! If you
attempt to resell the pattern, I will pursue my legal rights to the full extent
afforded by the law. You WILL be caught!
Materials:
- Fabric: You'll need about a yard and a half of 45" wide fabric.I would recommend
polar fleece for this project. It's lightweight, soft, and the edges don't strictly
need finishing, which is always a plus! If you don't want to use fleece, any
printed or solid fabric that will stand up to a fidgity toddler are probably
fine. You could use two layers of fabric, sewn right-sides together and then
turned, for a finished appearance, or use a pre-quilted fabric for simplicity.
It's all up to you :)
- If you want to finish the edges without a lot of fuss, bias
tape is generally the easiest finish. If you have a serger, just serge the edges. For polar fleece,
you don't really need to finish the edges, but FOE (fold over elastic) is a nice
look and feel. For woven fabrics, you'll probably want some finish on the leg
holes; they will be difficult to serge, so bias tape is probably the best bet.
You'll want a couple of packages if you're finishing the edges; whatever you
don't use to finish the edges can be used to make toy loops and that sort of
thing.
- Snaps or hook-and-loop tape (such as Velcro©) is great for fastening the handle and back extensions around the back of the seat and the handle. Or,
if you go to only one store with one size of cart, you can sew the edges down
permanently. If you'll be using the cover on more than one cart, I'd recommend
a repositionable closure of some kind.
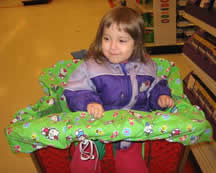
Simple cover (shown above):
 The very simplest cart cover, at least in terms of its shape, is a shape
with a drawstring or elastic in a casing around the edge. A standard cart will
require a rounded rectangle (in this case, a square with rounded corners) that's
about 45 " long
and 45" wide.
You can use two layers of fabric, or use one sturdy layer and some wide bias
tape. You can also make it with 90-degree corners, but I think it's much harder
to thread elastic through the corners.
The very simplest cart cover, at least in terms of its shape, is a shape
with a drawstring or elastic in a casing around the edge. A standard cart will
require a rounded rectangle (in this case, a square with rounded corners) that's
about 45 " long
and 45" wide.
You can use two layers of fabric, or use one sturdy layer and some wide bias
tape. You can also make it with 90-degree corners, but I think it's much harder
to thread elastic through the corners.
If using two layers, first cut out the leg openings and hem them with a single-fold
hem -- you could even baste the hems. I think it's best to measure the cart before
cutting the openings, since they're all slightly different, but putting the top
of the leg openings about 12-15" from the edge (so that the bottom of the
opening is about 16-20" from the edge) is fairly safe.
Sew the two layers together, right-sides together, so that the leg openings
match up, leaving about 1/2" unstitched at the front edge (in front of the
space between leg openings). Turn right-side out through one of the leg openings, then sew the leg openings together -- if you basted them originally, you can
use the basting stitches as a guide, then remove them when you've sewn them closed.
Stitch around the outside about 3/4 " from the edge, making a casing. Thread
a drawstring or some elastic through the hole in the casing.
Voila -- a very quick cart cover, which will also work as a high chair cover.
I made one like this and it works fine -- a lot puffier than I would ordinarily
prefer, but it does the job and Sophia likes the Hello Kitty print!
More complicated:
Here are the dimensions of the carts they have at our Shaw's Supermarket:
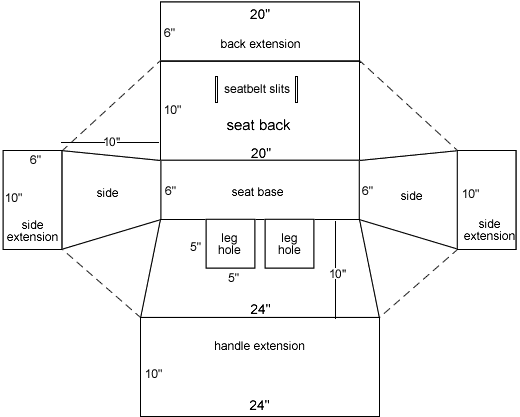
Warehouse stores, WalMarts, and other stores all have different carts, though,
so I'd recommend measuring the carts you use most frequently, in case the dimensions
differ significantly. (Here is a printable
GIF you can use to write down the measurements you've made. Remember to make
a note of where on the seat back the safety straps are attached.) the
side, back, and handle extensions are all somewhat longer than the sides, back,
and handle portions of the cart, to allow for some overlap to keep those surfaces
covered; the handle and back portions are also wider than the actual cart, sothere's some "ease" in putting it on the cart.
Fitted cover:
A more involved but more fitted cart cover will necessitate more cutting.
You can use the dimensions above, or your own measurements. You can cut
all the angles as shown in solid lines (outside only, obviously!), or use the
dashed lines to make a continuous seat portion. Without the fabric within the
dashed lines, the inside of the cart seat will be open on the edges. You could
sew those edges together, making a fitted seat, but then it will really fit only
one type of cart. If you can, I'd recommend using a very large piece of paper
to make an actual pattern. You can have it just 28" wide, as the cover is bilaterally
symmetrical, but the paper will need to be at least 28" by 42". An unfolded paper
grocery bag may suffice, if you tape another sheet of paper to one side for the
side extension. otherwise, you can try to mark your measurements and layout directly
on the fabric, making sure that all your right angles are really 90 degrees each
time.
Sewing:
For fleece, all you really need to do is cut -- no sewing is strictly necessary. Then apply some hook-and-loop tape to the sides of the handle and back extensions
so they can be fastened around the cart, or use diaper pins to fasten the extensions
into place, or apply snaps. The h&l tape and snaps will be best applied after
you have tried the cover on your favorite stores' carts, so you know where best
to apply them. I'd recommend using diaper pins on your first trip, then analyzing
where to put permanent fasteners afterwards. Or just stick with diaper pins :)
For woven fabrics, if you're using a single layer, just cut around the outsides
as you have determined them, then finish the edges with a serger or bias tape.
Cut the leg holes and finish them with bias tape. For a double layer, sew the
two fabrics right-sides together, then turn. The outside edges will all be finished,
and you'll need bias tape only for the leg holes. Attach fasteners as above.
For either fabric, make long buttonholes for the cart's safety straps. About
1.5" should suffice -- they should be long enough to allow the buckles to be
brought through.
I haven't made one of these for myself -- these are all just suggestions,
and as such, I'd appreciate some feedback if you choose to make one. I believe the directions are sound, especially for the polar fleece, but please
let me know if you run into any trouble.
Additions to the cover:
You may want to add a toy loop or two to the front of the seat portion, or
leng then the side extensions to make pockets for yours or baby's stuff. You can
use bias tape or self fabric for the toy loops, and just fold the fabric upwards
to make side pockets -- they will hang on the outside of the cart, and depending
on their depth, can be used for a water bottle, coupons, other toys, or whatever
else you like to have at hand.
I'd recommend making a simple drawstring bag to hold the cover when you're
not using it. Scraps from the cover itself should be more than enough to make
one. Fold the cover up and see how big it is, then sew a rectangle from the scraps
that's big enough, leaving 2" free on one end (that'll be the top). Make a casing
in the 2" you've left, so that the sides are open -- that's where the drawstring
will go. Cut two pieces of ribbon or bias tape or string (whatever's handy) to
2.5 times the width of the bag, then thread them through the holes. Each drawstring
will go through both of the flaps, making a loop on one side and a tied end on the other, so that the tied ends are opposite each other. Or you can use just
one drawstring, but I find the two-string bag to stay closed better, and open
easier.
Reader suggestions:
Sherron T. says: For the buckles it would be nice to use your own
instead of the dirty ones on the cart. I guess that you would need to have
two sets of buckles, one to attach the cover to the cart and the other to put
around the baby. Or one loose belt would work too maybe? the second
idea I have is to put a pocket on the cover that can be used to fold the cover
into itself to store.
BJ A. suggests these alterations: I used navy blue ribbing
around the leg holes for added comfort on my grandson's legs. I put 2 large
buttonholes opposite the leg holes and bought a webbing strap with buckle so
it can be threaded out the back to be attached to the cart, so baby has
his own seatbelt too.
Treece A. adds: I really like your pattern ideas and
need to make one for my 8 month old. I have one that I purchased for my last
baby, but it doesn’t
cover the sides of the cart. One thing that it has that I like is the belt. It
has the two long buttonholes and one long adjustable strap. You take one side
out and thread it through the back of the cart’s seat and back in through the buttonhole and around your baby. I am going to use mine as a pattern or just
use it all together when I make a new one.
Link to me!
Did you use this pattern and like it? Please link back to me from your site or blog! (This is not an invitation to copy the file to your site, nor does it imply that the file is freeware. I invite links, but as I do make changes to the files on my site from time to time -- and often they are important ones -- I do not wish them copied to other sites.)
All content, barring that which is otherwise attributed, is ©2023 to
Jan Andrea. If you wish to use my content on another page, please email before
doing so, even for content with the Creative Commons licenses. Text/images used
elsewhere must be attributed to me. Be advised that I will pursue copyright
violations.
 I've gotten so many requests for this that even though I never use a cart
cover myself, I felt it was time to sit down and tackle the problem. I'm trying
to do this without copying anyone else's design, but I'm sure I will inadvertently
incorporate features of existing cart covers, simply because there are only so
many variations on a cover that will fit a cart. Any such resemblance is purely
coincidental, however. I do own one cart cover, but I'm not wild about its design,
which does not seem to be original in any case.
I've gotten so many requests for this that even though I never use a cart
cover myself, I felt it was time to sit down and tackle the problem. I'm trying
to do this without copying anyone else's design, but I'm sure I will inadvertently
incorporate features of existing cart covers, simply because there are only so
many variations on a cover that will fit a cart. Any such resemblance is purely
coincidental, however. I do own one cart cover, but I'm not wild about its design,
which does not seem to be original in any case.