Podeagi: A Korean Baby Carrier Revised and corrected
16 November 2003
Materials needed:
- the amount of fabric you'll need will depend on the weight and number of
layers you want to use. If you want to make the bottom portion two layers,
you can use a lightweight fabric for summer and a heavier one for winter. It
can also be made of a single layer of a sturdier material. The top portion, which
is folded down during use (as shown above), should probably be of a heavier weight
than the blanket (lower) portion, as it is essentially what holds the baby upright
during use.
- Fabric widths are broken down below, if you want to use different fabrics
for each part:
- For a carrier with a single bottom portion (made of a fairly sturdy fabric):
- a 60" by 25" piece for the bottom portion (30" by 25" folded in half)
- 60" by 12" for the top portion (30" by 12" folded in half)
- Since you'll want a continuous strap, you'll need three strap sections, so
a piece 60" by 18" (folded, cut into thirds to 30" by 6" pieces)
- Totals:
- 60" wide fabric:1 yard plus 9 inches -- 1 1/3 yards if you
want some wiggle room.
- 45" wide fabric: 1 yard plus 24 inches -- two yards for more wiggle room.
Note: the fabric will need to be refolded perpendicular to the original fold,
so it's 45" by 30" instead of 22.5" by 60".
- For a carrier with a doubled bottom portion:
- a 60" by 50" piece for the bottom (30" by 50" folded
in half)
- 60" by 12" for the top portion (30" by 12" folded in
half)
- 60" by 12" for the straps, which are sewn between the two layers
on each side (30" by 12" folded in half).
- Totals:
- 60" wide fabric:2 yards plus 2 inches -- 2 and 1/8 yards will give you
some wiggle room.
- 45" wide fabric: two pieces that are 1 2/3 yards long. Note: the fabric
will need to be refolded perpendicular to the original fold, so it's 45" by
30" instead
of 22.5" by 60". The layout will be such that you get one bottom section
and the straps and top sections on one piece, and another bottom section on the
other piece. You will have some fabric left over.
- See the Fabric FAQ for specific fabric recommendations
and online sources
- You can also use bias tape to outline the bottom portion; a colour that matches
the contrast fabric of the top portion would be particularly striking.
- Sewing machine and thread to match/contrast with the fabric.
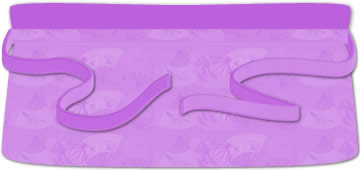
Pieces: Black lines are for cutting, red for sewing.
Don't worry too much about reproducing the exact curvatures. I made curved
lines because it seems more aes thetically pleasing, but it's hardly necessary.
Every manufacturer seems to have a different design, and you could just use
straight lines and 90 degree angles without harm to the wearability. Just make
sure all the top and bottom pieces are the same width where they are sewn together.
For the straps, you could also make one very long strip -- it would be about
180" in length, total -- to sew across the whole body of the carrier, instead
of just attaching the two straps to the ends. This method would be more secure,
as the strap would then also be weight-bearing. To make a long strip, just cut
out three instead of two, sew the short ends together, and then make the tube.
then, I would sew the top and bottom portions together, and then sew the long
strap to them at the base of the top portion. I've seen a couple of pages online
now by women who have actually sewn this carrier, and it seems that the straps
could stand to be a little longer, so you might consider doubling the length --
it's easy to cut length off (besides finishing the cut ends), but not as easy
to add length.
Caveats: If you have a very small or very large frame, this layout
may not work for you. If you are small, consider cutting a narrower bottom portion
(i.e. less than the 30" specified below). If you are large, you may need
a wider bottom portion, or this may be fine.
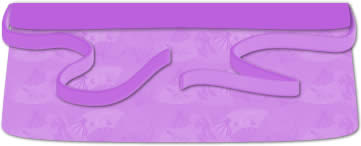
Layout:
 If
you use 60" fabric, you'll need about a yard and an two-thirds, if you're
just using one color/pattern. If you want a contrasting top piece as shown above,
you can get 54" for the main color and about 12" for the contrast.
If
you use 60" fabric, you'll need about a yard and an two-thirds, if you're
just using one color/pattern. If you want a contrasting top piece as shown above,
you can get 54" for the main color and about 12" for the contrast.
For 45" fabric, two cuts that are 60" long (1 2/3 yards) will
do nicely -- to lay the pattern out, open out the fabric (which usually comes
folded lengthwise) and fold it in half the other way, so that you have a piece
45" wide
and about 30" long. You can then lay out one bottom piece and one each of
the straps and top portions on each fabric cut.
To Sew: Seam allowances should be 1/2" throughout.
 First,
prepare the straps.
First,
prepare the straps.
- For Single-layer carrier:
- Sew the three strap sections together at the ends,
so that you have a single strip that's 180" by 6".
- Fold the strip in half lengthwise, and sew to make a tube, leaving one end
free for turning.
- Use a ruler or something similar to turn the tube right-side-out -- this
will be time-consuming, since it's so long. Finish the open end.
- You'll need to finish the sides and bottom of the blanket portion before
sewing on the straps -- a simple turned hem, or bias tape, are both fine.
- Pin the strap to the top edge of the bottom, about 3/4" down from the top,
and such that there are two equal-length straps on each side. Sew.
- For Double-layer carrier:
- Fold in half lengthwise, and sew the edges, leaving one edge free for turning.
- Turn, press (if desired), and topstitch the edges (if desired).
- Sew one strap to each edge of a single bottom piece, as shown at right, at
the top of the seam allowance.
- Double layer carrier, bottom pieces:
- Place the pieces right-sides together
- Sew the left, bottom, and right sides together, being careful not to catch
the straps in the stitching. Reinforce the stitching where the straps attach --
these will bear most of the baby's weight, and need to be very secure.
- Turn the piece right-side out, and stay-stitch the top of the pieces.
- Top pieces: (If you have ever sewed a shirt collar, this is very similar)
 Sew the two top pieces right-sides together along the curved edges, leaving
the straight edge free.
Sew the two top pieces right-sides together along the curved edges, leaving
the straight edge free. - Turn the piece right-side out.
- Treating bottom pieces as one, pin
one top edge to the bottom pieces, right sides
together, leaving the other top edge free.
- Sew those edges together, being careful not to catch either the straps or
the other top edge in the stitching.
- Fold the unstitched edge of the top piece under by 5/8", then topstitch
it to the unit, as shown at right.
- Finishing: You may elect to topstitch around the edges of the whole podeagi,
or use bias tape around the lower edges. either is up to you.
- Wearing:
- Wears
the Baby has a guide with pictures, which I will not attempt to duplicate...
mostly because my "baby" is now a 30-pound toddler, and I don't think
this carrier is meant for kids that size!
- Peppermint.com now has directions as well, with different positions, like
a front carry and two modified back carries. With illustrations.
- the only other page I saw with podeagi suggested that they would be marvelous
for parents adopting Korean infants, as they are already used to being carried
this way. So if you know someone who is adopting from Korea or possibly other
sou theast Asian countries, you might consider making one of these for them.
- Renee R. has pictures
of a podeagi she made for her little boy, following these instructions!
She says of its construction, "I must tell you though, I modified your directions
a lot to fit me, I made the blanket 70" across [ra ther than 60'], and the
straps are around 60" [ra ther than 56"] each." I asked her about
how it would fit a larger woman (like me :) and she said, "I am, as per the
picture, not a small thing. I think that similar modifications would make it work
on a larger-breasted woman, I think the big thing is making sure the blanket part
goes far enough around so that the straps don't cut off circulation."
As for wearing, she said, "I think it was a bit weird for my son, as he's
used to front-carrier slings, but he was comfortable and enjoyed it."
Other directions on the web:
Narrow-blanket
podaegi with patchwork -- very pretty!
Simpler pattern, narrow-blanket, written
to be sewn using a cut-apart wraparound carrier. Could also be done with home-dec weight fabric.
All content, barring that which is otherwise attributed, is ©2023 to
Jan Andrea. If you wish to use my content on another page, please email before
doing so, even for content with the Creative Commons licenses. Text/images used
elsewhere must be attributed to me. Be advised that I will pursue copyright
violations.